
How to replace your RV kitchen handles in a DIY RV renovation

Replacing kitchen hardware, like changing a cabinet handle, is one of the easiest things you can do to update a kitchen. That is, in a normal house. But RV renovation isn't normal DIY home reno and replacing the push to close latches in our RV proved more of a challenge than I would've expected. Which is part of what made it fun! And admittedly, a total pain in the ass sometimes.
After 2 years of planning, I quit my full-time job and my partner and I moved into our RV for full-time van life. Because this wasn't just a weekending vehicle, we invested in getting her extra homey and functional.
One of the biggest projects we took on in the first month was a budget renovation of the RV kitchen. I wanted it to feel like you'd wandered into a country cottage kitchen—plenty of warmth, femininity, and natural details. It also needed to be packed full of storage solutions that would be safe while in transit. If you're curious, I shared my inspiration and design plans in another post.
A key element to achieving the look was to change the push to close latches on the RV cabinets. They were a dated chrome finish and lacked character. Instead, I installed more traditional brass handles that could patina with love and use—and give a hint of that well-loved cottage aesthetic. (We also added interior cupboard closures for security later.)
I found just the right cabinet pulls for our RV at Bolibar hardware store in Barcelona. Their selection is impressive! Spanning tons of rooms, metal types, and aesthetic styles from modern to old world-inspired (my preference, of course). The staff was both friendly and helpful, despite my broken Spanish.
It wasn't until I was home, tools out, and ready to dig in, that I really realized just how much labor (and creativity) it was going to take to get these new door handles up and running. I thought I'd share the process I followed for upgrading our RV kitchen cabinets, so you can save some time and hassle in your own DIY van build.
Why is it harder than upgrading normal handles?
If you don't have your hands on your van yet, you might not realize that the door handles used in mobile homes differ from everyday hardware. I mean, your run of the mill dresser isn't barreling down the highway at 70 mph.
Most vans and RVs will have some sort of latch and pneumatic closer combo that secures the door while in transit. Highly important, so that the few prized possessions you still own don't come flying out while you drive and try impaling your dog...or so I've heard. 😬🙈
There's a variety of specific options, but the setup will look something like this:
Our RV had the push to close latches. Aptly named, you simply push the knobbly bit in to lock the door into place. Because they're an all-in-one fixture they leave big ol' holes in the door when you remove them.
I was committed to a specific vision for the kitchen in my head, so I had to find a solution for filling the holes in all 10 doors and ensure they'd hold up to the everyday force of opening and closing the doors. So with the challenges clear, here's what I used to tackle the project.

Supplies I used to complete the project:
10 cabinet handles + 10 screws
10 pull force cabinet latches + 40 screws
1 dowel rod
Saw
Hammer
Flathead screwdriver
Drill (to pre-drill hole and fasten screw)
Spackle
Sand paper (fine grit between 100-120)
Step 1: Removed the old closures
Kinda hard to tell here, but the screws were poor quality and pretty chewed up. So it was tougher than anticipated to get them out. After some research, I found a way to get the drill to catch the screw heads and was able to remove all 10 cabinet handles.
Once unscrewed, removing the main mechanism was pretty easy, but there was also a grommet (or metal ring) that proved a little more stubborn. I used a flat head screwdriver to gently hammer them out of the wood.
Step 2: Cut and sand dowel rod fillers
I'd started the project before having a plan for filling the gaping holes in the cupboards. And one night as I was falling asleep, the solution came to me! (I know, I know, this is the stuff of my dreams. 🤷♀️)
I bought a dowel rod that was at least 10x the depth of one of the holes and then hand-sawed it into 10 individual fillers. Each one the approximate depth of the door. Cutting each of these by hand was time-consuming. If we had one, a circular saw would've been a better option. You can also ask your hardware store if they offer the service.

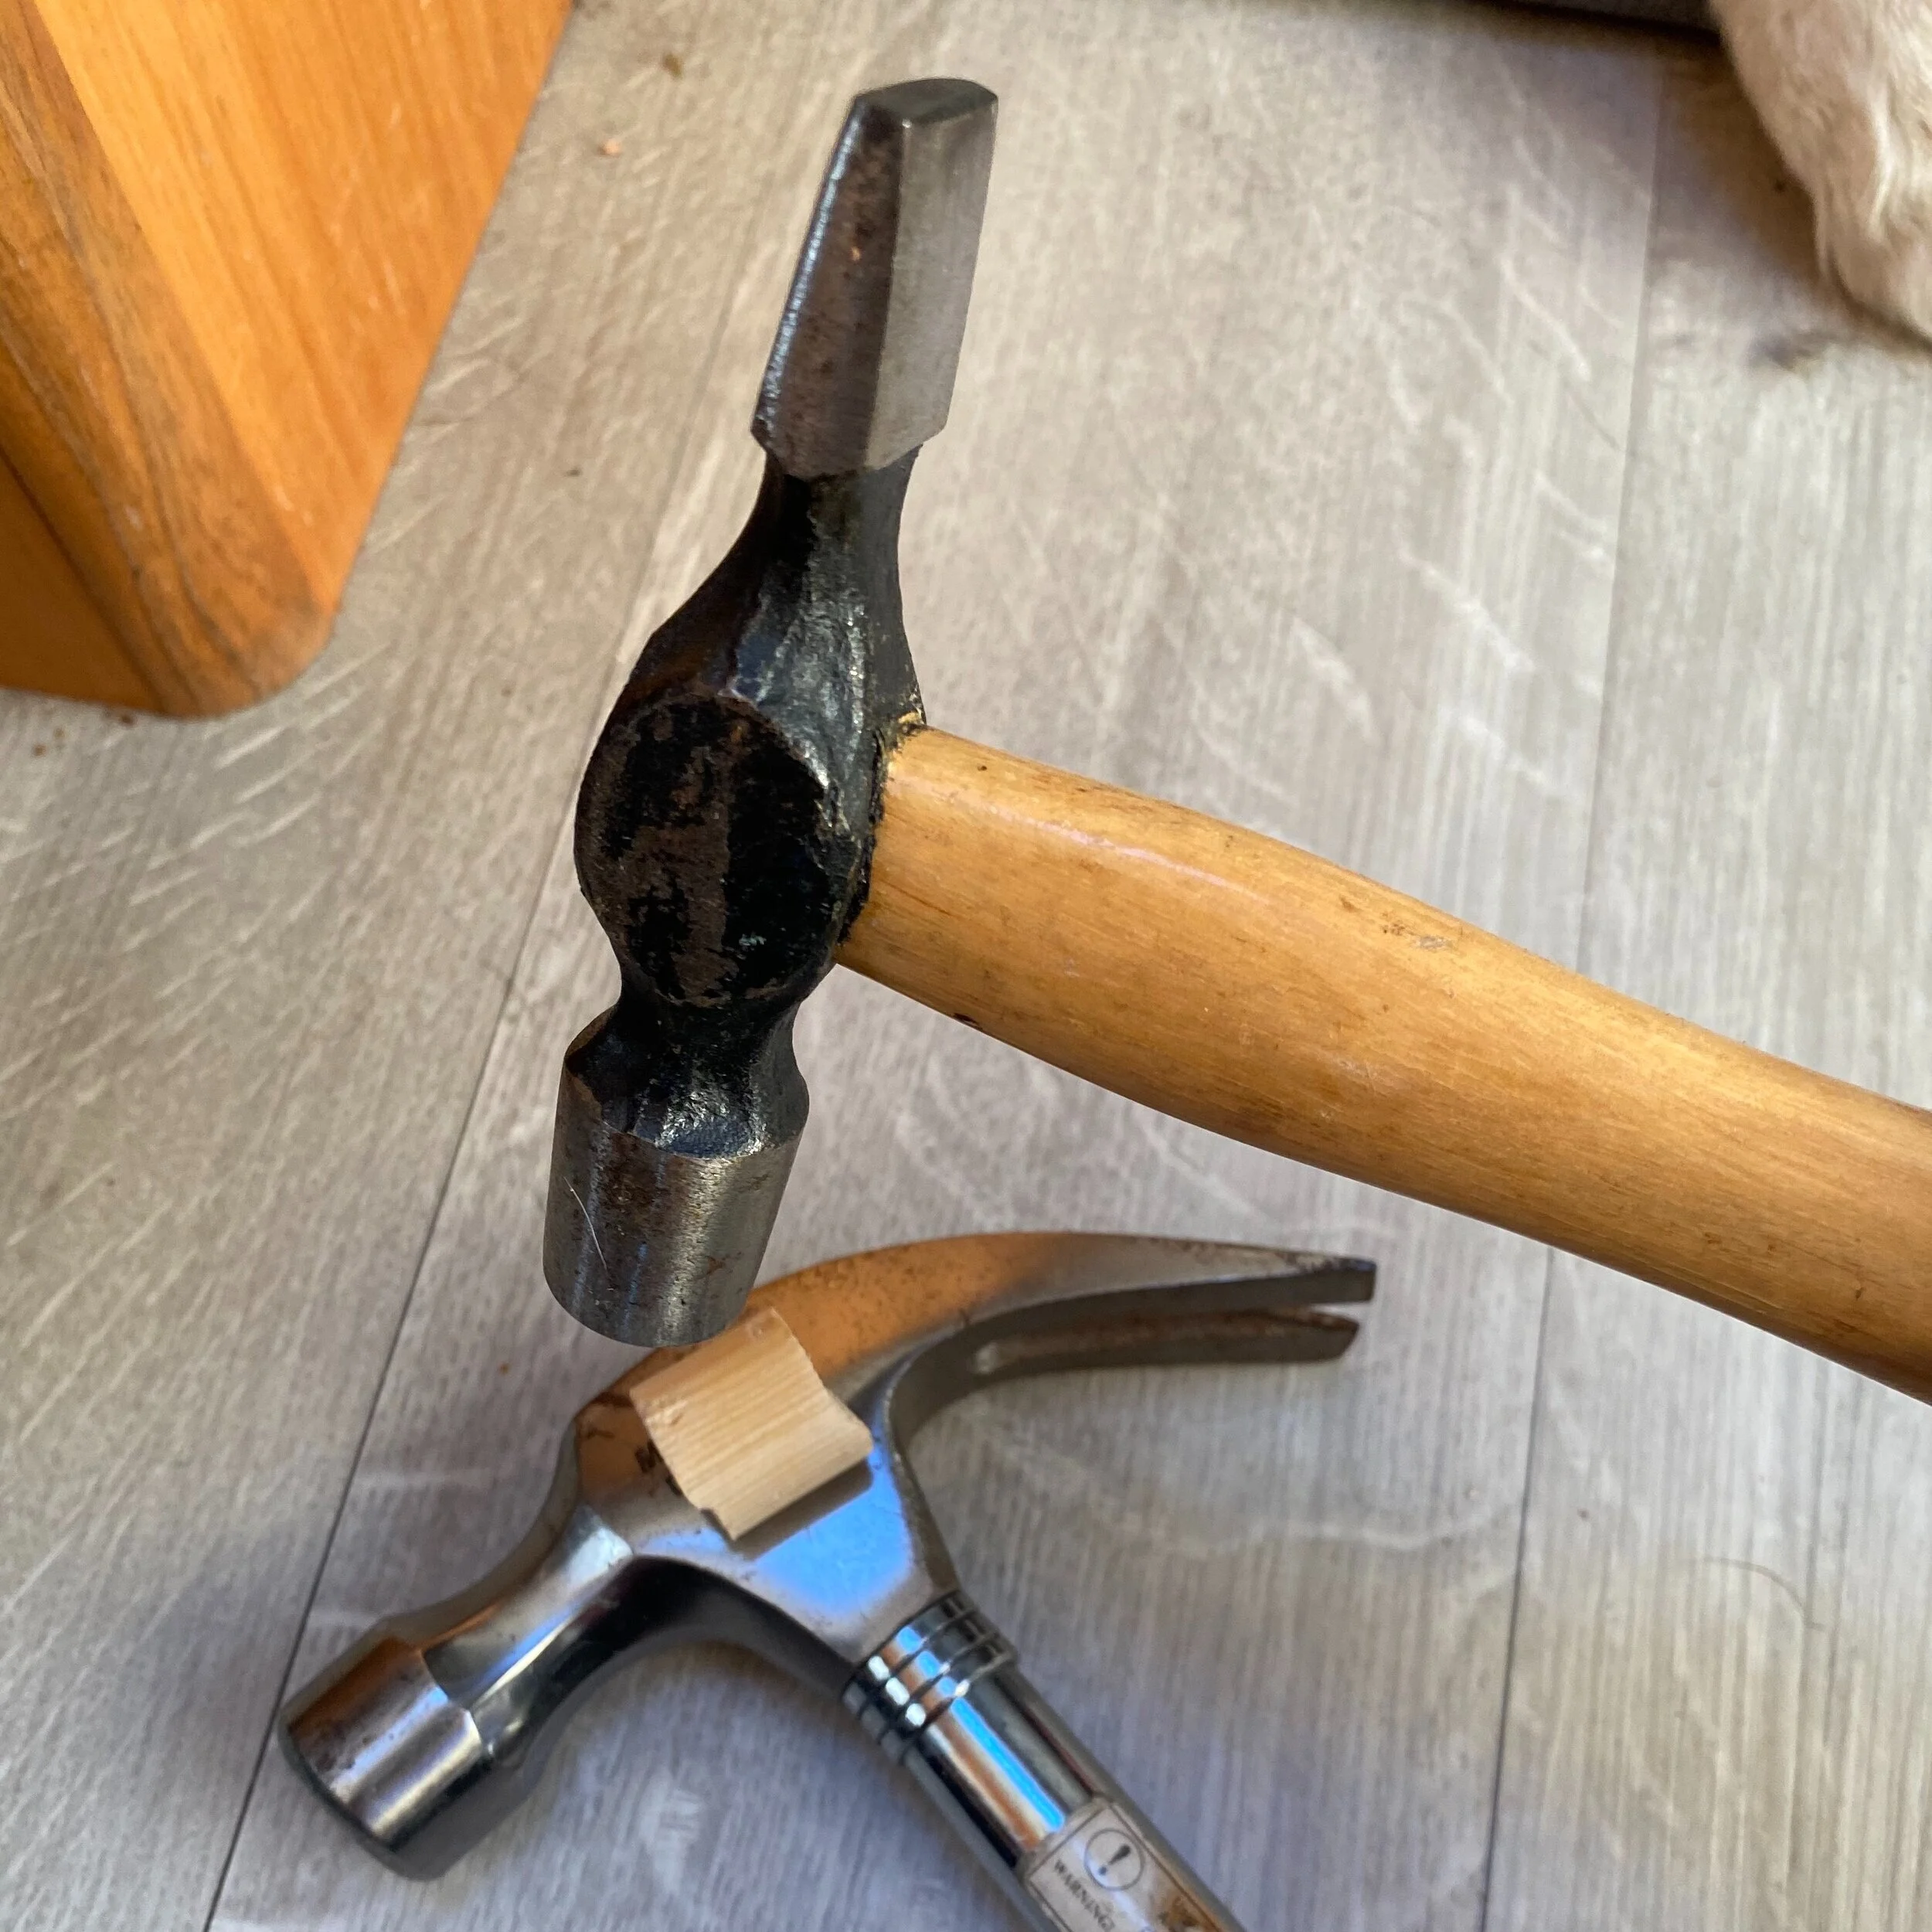
Step 3: Hammer to size—avoid your fingers
Because I'd estimated the diameter of the hole—you always forget something before getting to the hardware store—the dowel rod was just a smidge too fat to fit. So Chris suggested hammering them down in size. Genius! This also helped ensure it was a snug fit that would hold up to daily use.
To do this, I set each of the dowel rod pieces on top of another hammer, holding them in place, I just hammered at them to compress the wood. Any hard, not-easily-dentable surface will do—you're meant to avoid hitting it anyway. Give it a good couple thwacks, then rotate it slightly and continuing hammering until you've made it the whole 360 degrees around the dowel.
Magically, I avoided my thumbs. Mostly.
Step 4: Hammer them into place
Then, my favorite part! Using just your hands, gently force them into the fillers into the hole left by the previous knobs. Just enough that they stay put on their own. Keeping it as flush and evenly inserted as possible.
I suggest hammering from the exterior of the cupboard (what you see) toward the inside of the cupboard in case you have any splintering from forcing it in, it'll be hidden on the inside.
You want it to be a snug fit, so the force of opening and closing the door doesn't pull the dowel rod out. I chose to screw through this same area to add my new knobs, but to be totally sure, you could reattach your new hardware slightly above or below the old holes.
Step 5: Spackle over to create smooth surface
To get a smooth finish when you paint them, I decided to spackle over the raw wood. I used an fast drying option I already had on hand, but for RV or van use, a flexible option might be best.
Step 6: Sand off excess spackle and then paint
I applied the spackle generously, so I sanded it down for a smooth finish. I then, primed and painted it with a fresh new color. I went with kitchen-specific paint to help it hold up to water and food grime.
Step 7: Pre-drill hole for new handle hardware
It's finally time to get your beautiful, new handles up! The screws that came with the handles were flat-tipped and therefore wouldn't drill through the wood. They're meant to screw into the back of the handle. So you'll need to pre-drill a hole that guides the screw through the wood. Nothing in a caravan is perfectly straight, so use your best judgment about the angle you drill into the wood. You want to make sure the back of the handle will sit flush against the door. You don't wanna end up with a crooked knob (hahaha ok ok I had to).

Bonus tip: Check your screw length
Renovating in a foreign country poses lots of challenges, like unfamiliar brands for supplies and expertise or recommendations that get lost in translation. The hardware store didn't ask what length screw I needed so they provided a universal one you can clip down to the size you need. Thing is...we didn't have metal clippers. So we had to handsaw every 👏 single 👏 screw 👏. I suggest measuring the depth of the door and providing that information to your hardware store so they can provide the right length screw upfront.

